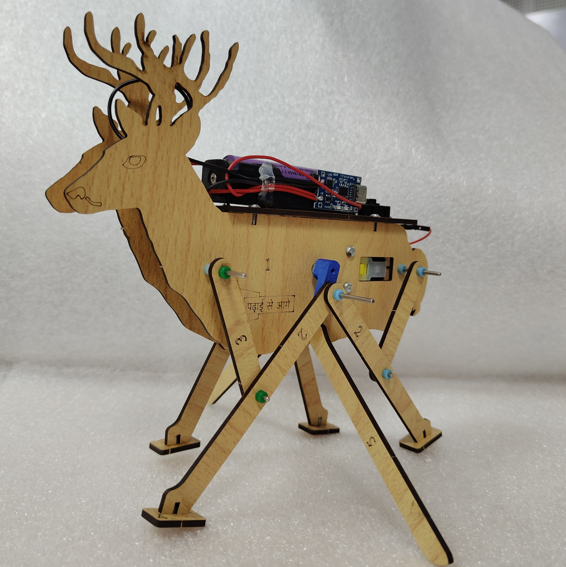
Six-Leg Robot
PSA
This isn't just a robot; it is a lesson in Biomimicry and Modern Electronics. It answers two big ques ons: 'How do insects walk over rough ground?' and 'How do we power machines sustainably?' By building this, students learn about complex mechanical linkages and move away from use-and-throw ba eries to Rechargeable Technology, just like in Electric Vehicles and Smartphones.
Linkages
Skill practiced while building this kit.
Biomimicry
Skill practiced while building this kit.
Green Energy
Skill practiced while building this kit.
Add ₹570 more for free delivery
Shipping ₹79 · Free at ₹1,500+
Check delivery
Razorpay secure payFree delivery ₹1,500+7-day returns
Shipping & returns FAQ
How long does shipping take?
Standard shipping is ₹79. Free shipping on orders of ₹1500 or more (merchandise subtotal after promo). Delivery typically 5–7 business days across India.
What payment methods do you accept?
UPI, credit/debit cards, and netbanking via Razorpay. Cash on Delivery is not available.
Can I get a GST invoice?
Yes. Add your GSTIN on checkout (optional). After payment you can print a receipt; for a full GST tax invoice with HSN, email support with your GSTIN and order id.
What is your return policy?
Unopened kits may be returned within 7 days of delivery. Opened educational kits are exchange-only for manufacturing defects. Contact support with your order id.
Is checkout secure?
Yes. Payments are processed by Razorpay over HTTPS. We never store your full card details on PSA servers.
Free delivery on merchandise subtotal ₹1,500+. See shipping & returns.
About This Kit
What's Included
Parts checklist will appear here once published for this kit.
Learning Outcomes
Build guide (10 steps)
Check if you have all these parts!
Wooden Sheets: The Robot Skeleton! (1: Main Body, 2: Robot Head, 3: Long Legs (8 pieces), 4: Short Legs (8 pieces), 5: Top Roof, 6: Support Plate). 7: Orange Wheels (Rover Tires) 8: Metal Rods (Leg Axles) 9: Screwdriver (Mission Tool) 10: Battery Box & Charger (Energy Station) 11: Screws & Bolts (Tiny Pins) 12: Blue Spacers (Joint Washers - Don't lose them!) 13: Red Wire (Connector) 14: Yellow Motor (Space Engine) 15: Purple Battery (Rocket Fuel) 16: Purple Rockers (Moving Joints) 17: Switch (Launch Button)
Preparing the Magic Button!
Action: Hooking up the switch. Let's connect the robot's brain! 1. Find the Battery Box (10) and the Switch (17). 2. Find the separate Red Wire (13). 3. Twist connection on 1: Take the Red Wire connected to the Battery Box. Twist the shiny metal end lightly around one of the metal feet on the switch. 4. Twist connect on 2: Take the separate Red Wire (13). Twist one end around the other metal foot on the switch.
The Engine Room!
Action: Plug & Play Wiring. Let's power up! 1. Connect: Find the wires on the Motor and the Battery Box. 2. Click: Push the Plug (Pin) into the Socket (Hole). Slide them together un l they feel tight! 3. Mount: Place the Motor into the slot of wooden Part 1. 4. Lock: Slide the Long Bolts (Part 11) through the wood and motor holes. Screw them tight!
The Control Deck!
Action: Installing the switch plate. Let's build the robot's roof! 1. Find the Part: Look for the small wooden plate labeled No. 6. 2. Mount the Roof: Place Part 6 on top of the robot's body walls. 3. Lock it: Use the Small Screws (Part 11) to screw it down tight. 4. Install the Switch: Place the Switch (17) onto Part 6. Use Small Screws (Part 11) to fix it tight so it doesn't wiggle when you push it!
The Back Armor!
Action: Securing the rear panel. Let's protect the engine! 1. Find the Part: Look for the wooden plate labeled No. 5 (The Back Plate). 2. Align: Place it on the back of the robot body (behind the motor). 3. Screw it Down: Use the Small Screws (Part 11) and your Screwdriver to fix it tight to the body walls. 4. Check: Make sure the plate is straight and not wobbly!
Power, Face & Drive Arms!
Action: Completing the body & prepping cranks. Let's finish the body and build the movers! 1. Mount the Tank: Fix the Battery Box (10) to the Back Plate (Part 5) using Small Screws (11). 2. Robot Face: Attach the Front Panel (Part 2) to the front of the body using Small Screws. 3. Prepare Drive Arms: o Find the two Purple Rockers (Part 16). o Find the Medium Metal Rods (Part 8). o Push: Slide one metal rod into the hole of each purple rocker. Make sure it fits tight!
The Walking Crank!
Action: Setting the leg rhythm. Let's get ready to walk! 1. Fix Rockers: Push Purple Rockers onto motor axles. Important: Point one UP, one DOWN (180° opposite). Lock with screws. 2. Axles: Slide Long Rods through the body holes. 3. Spacers: Add Blue Rings to lock the spacing: o 1 Ring on each Rocker pin. o 3 Rings on each side of the Long Rods.
The Leg Stack!
Action: Assembling 4 identical leg pairs. Let's mass-produce the robot legs! 1. The Stack: Lay down one Long S ck (3) and one Short Stick (4) side-by-side. 2. Double It: Place another Long Stick (3) and Short Stick (4) right on top. 3. The Connection: Push a Small Metal Axle through the holes of the Long Sticks (3) only. 4. Lock it: Slide a Blue Spacer onto both ends of the small axle to hold the sticks together. 5. REPEAT: Do this again to make 4 Pairs total! 6. Critical Rule: Keep the Short Sticks (4) loose! Do NOT put an axle through the Short Sticks yet.
The Walking Linkage!
Action: Connecting legs to the motor & body. Let's attach the legs to the power! 1. Crank Connection: Slide the top hole of Part 3 onto the Medium Axle (on the Purple Rocker). 2. Body Connection: Slide the empty holes of the leg stack onto the Long Axle (on the body). 3. Lock the Top: Push 1 Blue Spacer onto the Medium Axle to lock the leg to the rocker. 4. Lock the Bottom: Push 2 Blue Spacers onto the end of the Long Axle to keep the legs safe. 5. Repeat: Do this for all 4 Leg Stacks!
Wheels & Lift Off!
Action: Attaching the feet and powering up. Let's put shoes on our robot and bring it to life! 1. Wheel Prep: Slide a Small Axle into the center of the Orange Wheels. 2. Spacer First: Slide 1 Blue Spacer onto the axle (this keeps the wheel away from the wood). 3. Attach Feet: Push the wheel axles into the 6 empty holes at the bottom of the Long Sticks (Part 3). 4. Lock it: Slide 1 Blue Spacer onto the end of the axle to lock the wheel in place. 5. Power Up: Insert the Purple Battery (15) into the battery box. Check the (+) and (-) signs!